Everything runners should know about this little known muscle.

Most runners are familiar with the big muscles involved in running, like quads, hamstrings, and glutes. But there are lesser-known, yet still important players that can influence run performance. One example: the quadratus lumborum, or QL for short.
A deep trunk muscle, the QL attaches to the lower spine and the backside of the pelvis, physical therapist Nicole Haas, P.T., D.P.T., founder of Boulder Physiolab in Boulder, Colorado, tells Runner’s World. It serves a few different functions in daily life, helping you arch your back, side bend to the same side, and rotate to the same side, Haas explains.
When you run, the QL plays more of a stabilizing role, working to control your pelvis and trunk while you stride, physical therapist Spencer Agnew, P.T., D.P.T., founder of Peak Endurance Performance and Physical Therapy in Madison, Wisconsin, tells Runner’s World. The QL also assists with breathing, specifically when you inhale, Agnew adds.
If this muscle is tight or irritated (which can happen for a number of reasons, which we cover below), you’ll likely feel pain in your back and/or SI joints (which link the pelvis and lower spine), Agnew says. Luckily, there are a few at-home solutions for calming an angry QL. Here’s all you need to know.
Common Causes of a Tight QL
There are several reasons your QL might be yelling at you. A common one? Your hip flexors are tight. In particular, when the psoas (a big, rope-like hip flexor muscle that runs from your low back to the front of your hip) is shortened, it can pull your pelvis into an anterior tilt, meaning your pelvis is tipped forward. In many cases, this yanks on your QL as well, because the psoas and QL both insert into the same group of vertebrae in your low back, Agnew explains.
Another culprit is weak glutes. When your glutes aren’t strong enough to help you maintain good running mechanics, your knee can collapse inward as you land and your hip on the opposite side can dip down, Haas explains. This, in turn, can cause your trunk to side bend and rotate, thus placing a ton of force on your QL. The problem can be exacerbated when you run downhill, Haas adds, because that can cause your low back to arch and place further stress on your QL.
Yet another cause of an irritated QL is upper-back stiffness. Restrictions in the upper part of the spine can toss forces downward onto the QL, Haas explains. So can issues in your shoulders, hips, and mid-back. If these areas aren’t moving like they should due to pain or injury, then forces can get thrown onto your QL instead, Haas says.
Keep in mind that in some cases, your QL may hurt because it’s taking on a bunch of extra stress it’s not meant to, but the muscle itself probably isn’t tight. “It’s more like it’s just mad because everything has been collapsing around it and loading it,” Haas says. “It’s overworked and under-appreciated.”
The Problems That Arise from an Irritated QL
A tight-feeling QL is worth addressing, considering it can lead to a few not-so-great issues if left unchecked. A big one? Compromised running mechanics.
A tight QL, as mentioned, can shorten your hip flexors and pull your pelvis into an anterior tilt, which will reduce your knee lift as you stride, Agnew says. As a result, “you’re not going to be able to generate as much force moving forward, and you’ll have more of that arched [back] position when you run,” he explains. In many cases, this can deliver a double whammy of reduced performance and increased back pain, he says.
On top of that, a tight QL can also hinder your breathing. Like we mentioned, one of the QL’s jobs is to help you inhale, so when this muscle is tight, you may not be able to breathe as deeply or easily, Agnew says.
How to Address a Tight QL: Part 1
Plagued by what you think may be an irritated QL? Try this three-step at-home series, from Agnew, to help reduce your discomfort.
How to use this list: Perform this sequence often as everyday if you’re in significant discomfort that’s limiting your ability to run. In the case of more minor pain, incorporate this series two to three times a week. Doing this on the days that you’re running? Perform the myofascial release, pelvic tilts, and hip hikes before you lace up, then tackle the other components afterward.
Step 1: Do myofascial release
This can help turn down the pain response in a barking QL by desensitizing soft tissue, Agnew explains.
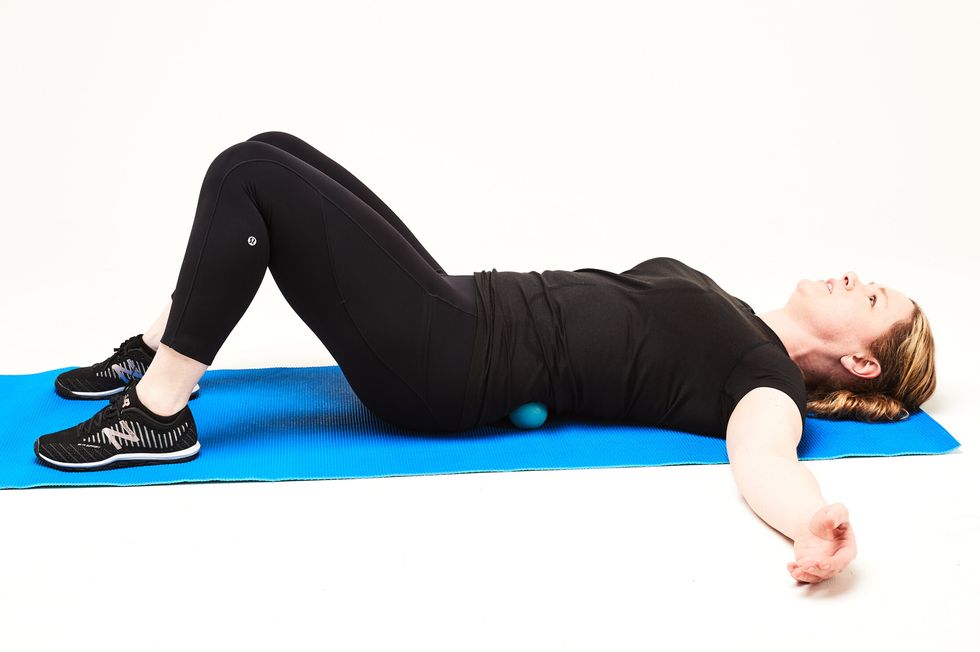
- Lie faceup on the ground, or stand near a wall, and place a softball, lacrosse ball, or trigger point ball on the low back area that feels tight.
- Apply pressure for about 30 seconds, making sure to breathe continuously through your diaphragm, then reposition the ball to hit another region of the low back that feels tight.
- Repeat several times, targeting all the areas that feel tight. This portion should take about 2-5 total minutes (or however much time you have). It’s okay if the pressure of the ball feels uncomfortable, but it should not feel so intense that you can’t sustain it for a 30-second hold. If it’s too intense, lighten the pressure by reducing how much body weight you are pressing into the ball.
Step 2: Practice proper pelvic mechanics, then activate, strengthen, and stabilize your QL
The pelvic tilts help you learn how to coordinate and control pelvic motion so you can maintain good positioning for running, and the hip hikes help activate your QL. The kettlebell side bend increases blood flow to the muscle, which can aid in healing. And the suitcase carry increases stability and engagement of the muscle, which can ensure it functions properly while running.
Pelvic Tilt
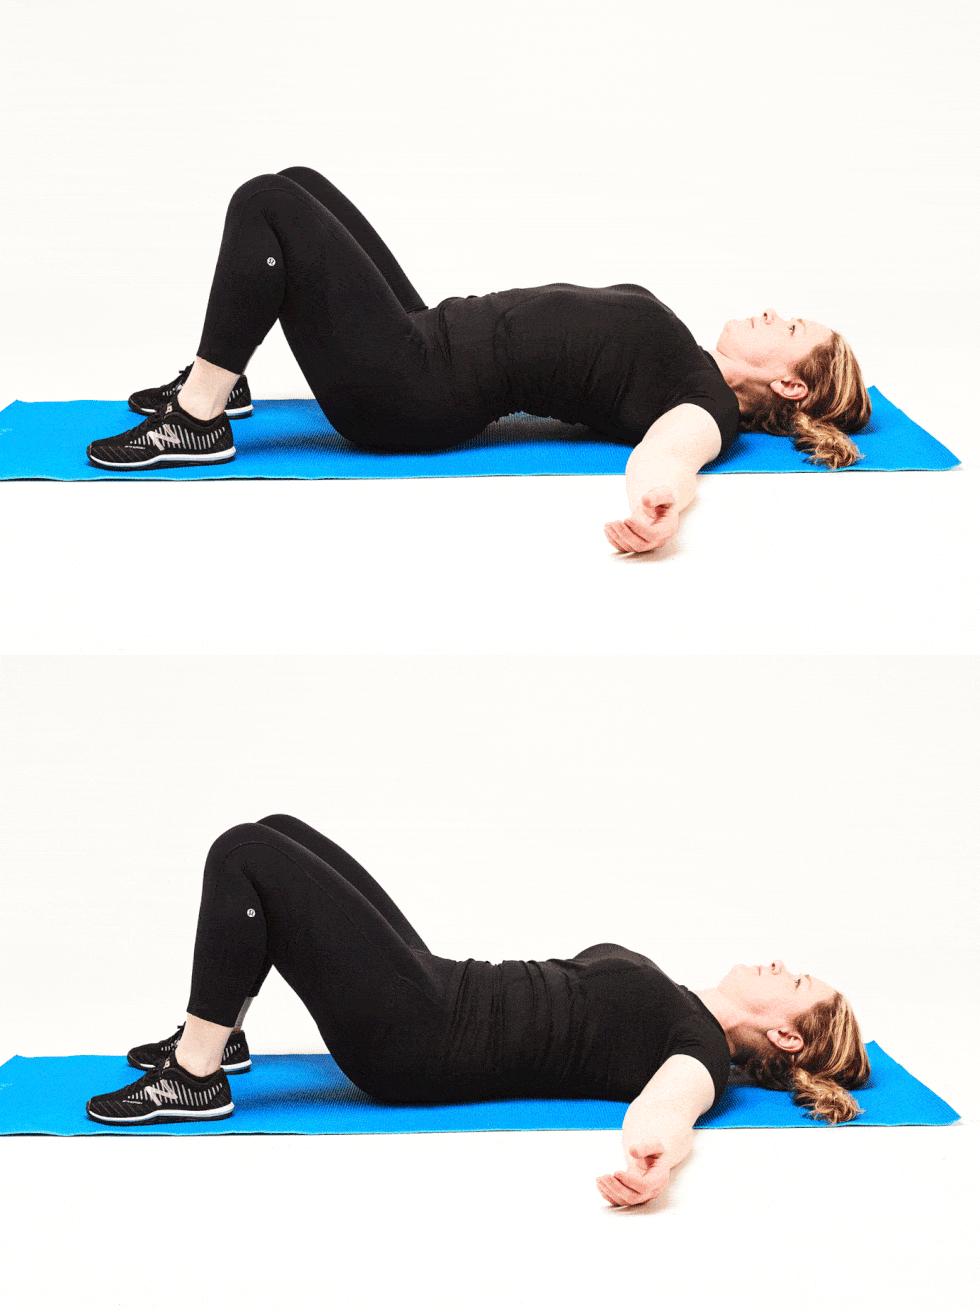
- Lie faceup, knees bent and feet planted.
- Alternate between arching low back and rounding low back against mat.
- Repeat. Do 30 reps.
- Then, try to find the middle ground—where your pelvis is in a neutral position. This is what you want to maintain for the following moves (and while running).
Hip Hike
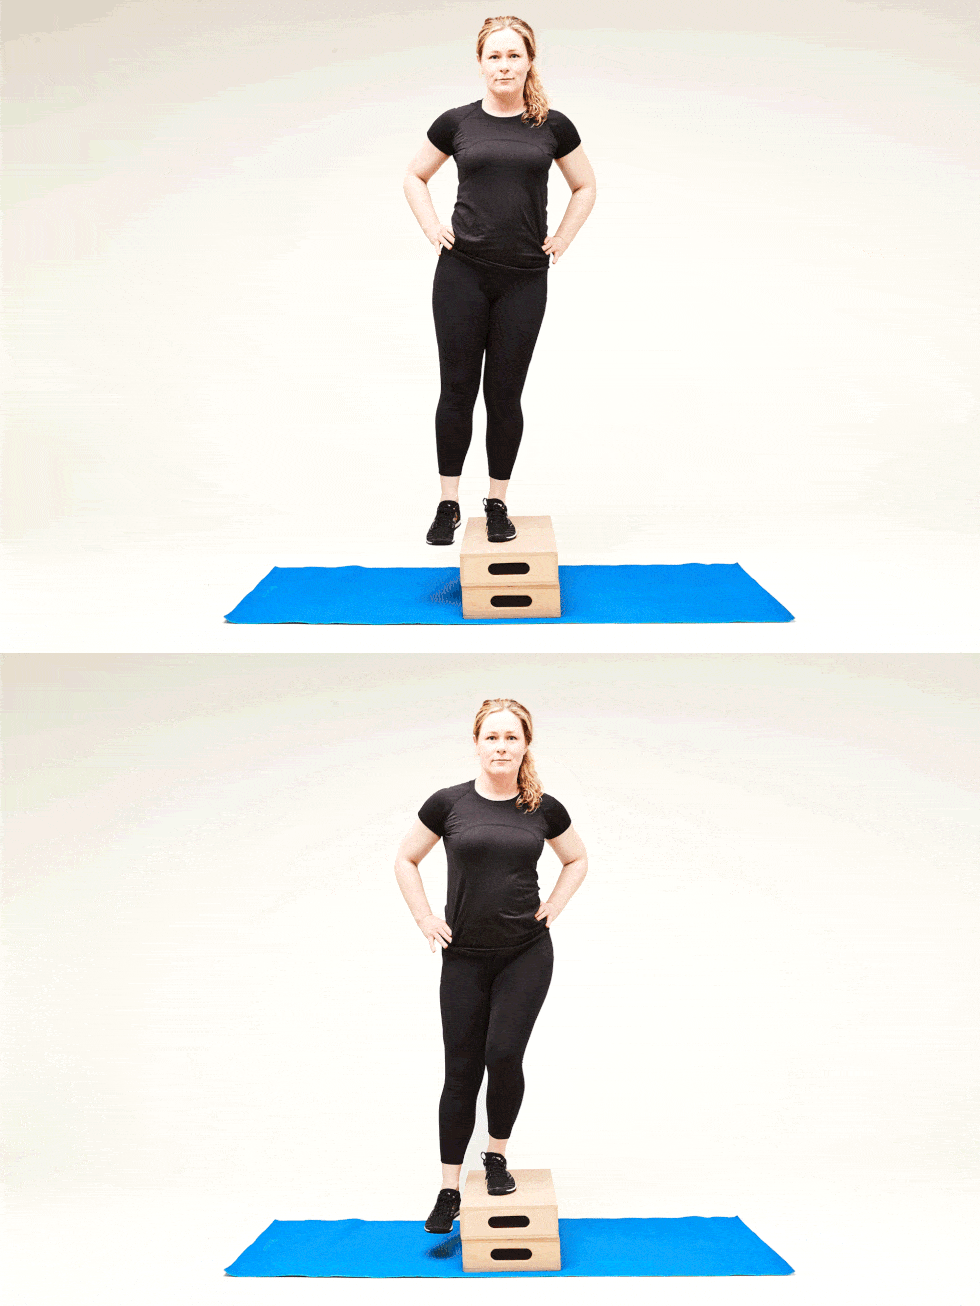
- Stand with left foot on step, right foot dangling off step.
- Without bending left knee, drop right pelvis off the edge of the step.
- Then pull it back to a level position.
- Repeat. Do 12-15 reps.
- Then switch sides and repeat. Do 2 sets total.
Kettlebell Side Bend
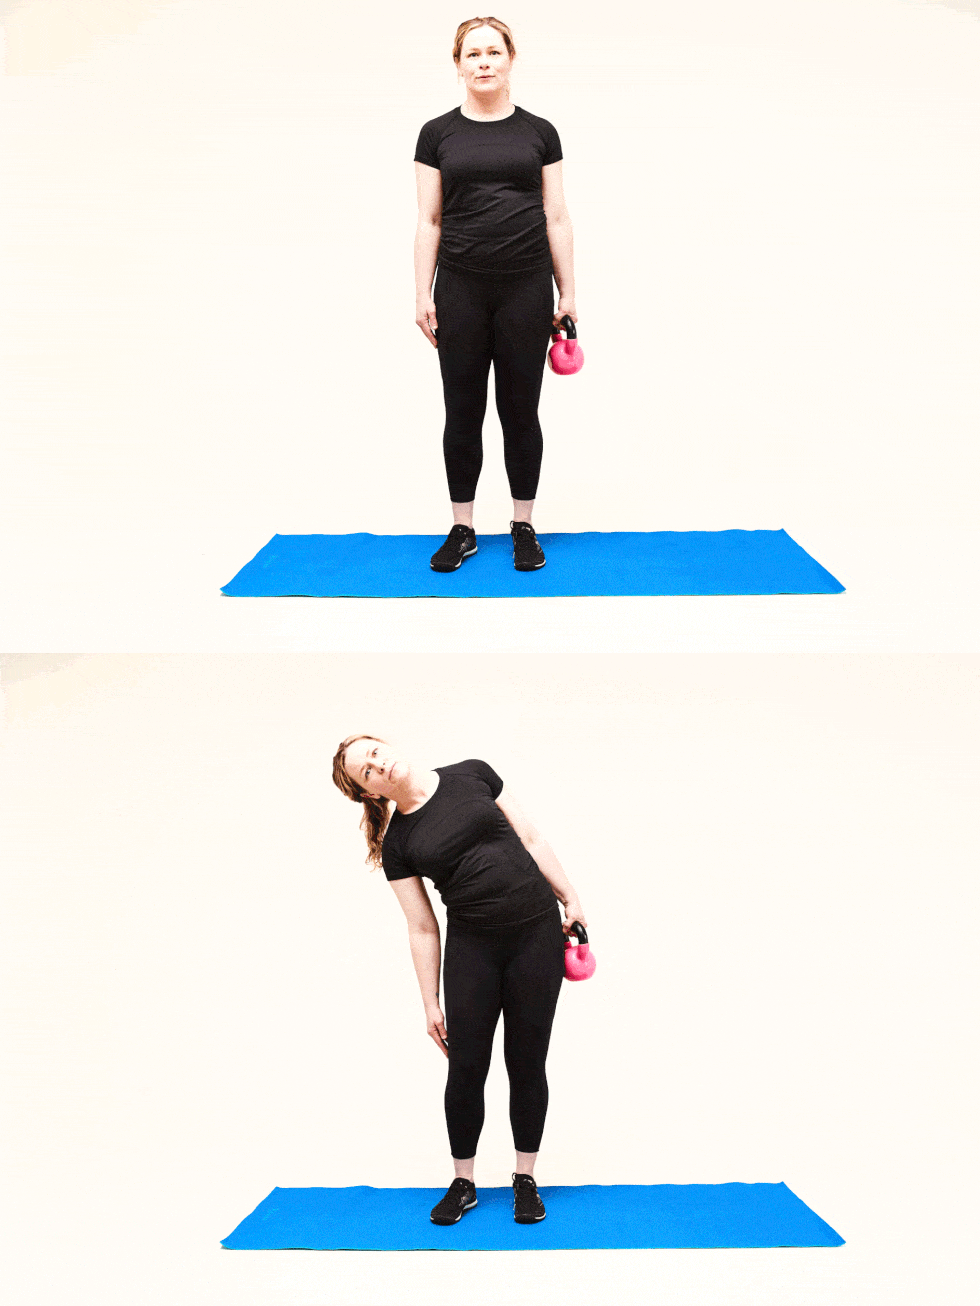
- Stand tall and hold a heavy kettlebell in right hand. (You can also use a dumbbell, other free weight, or a heavy household object.)
- Side bend to left.
- Pull the kettlebell back up, staying rigid through trunk, and returning to a neutral position. Make sure the motion is purely a side bend; don’t rotate or lean back.
- Repeat. Do 12-15 reps.
- Then switch sides and repeat. Do 2 sets total. If you can’t manage 12 reps, pick a lighter weight that allows you to reach the 12 rep mark.
Suitcase Carry
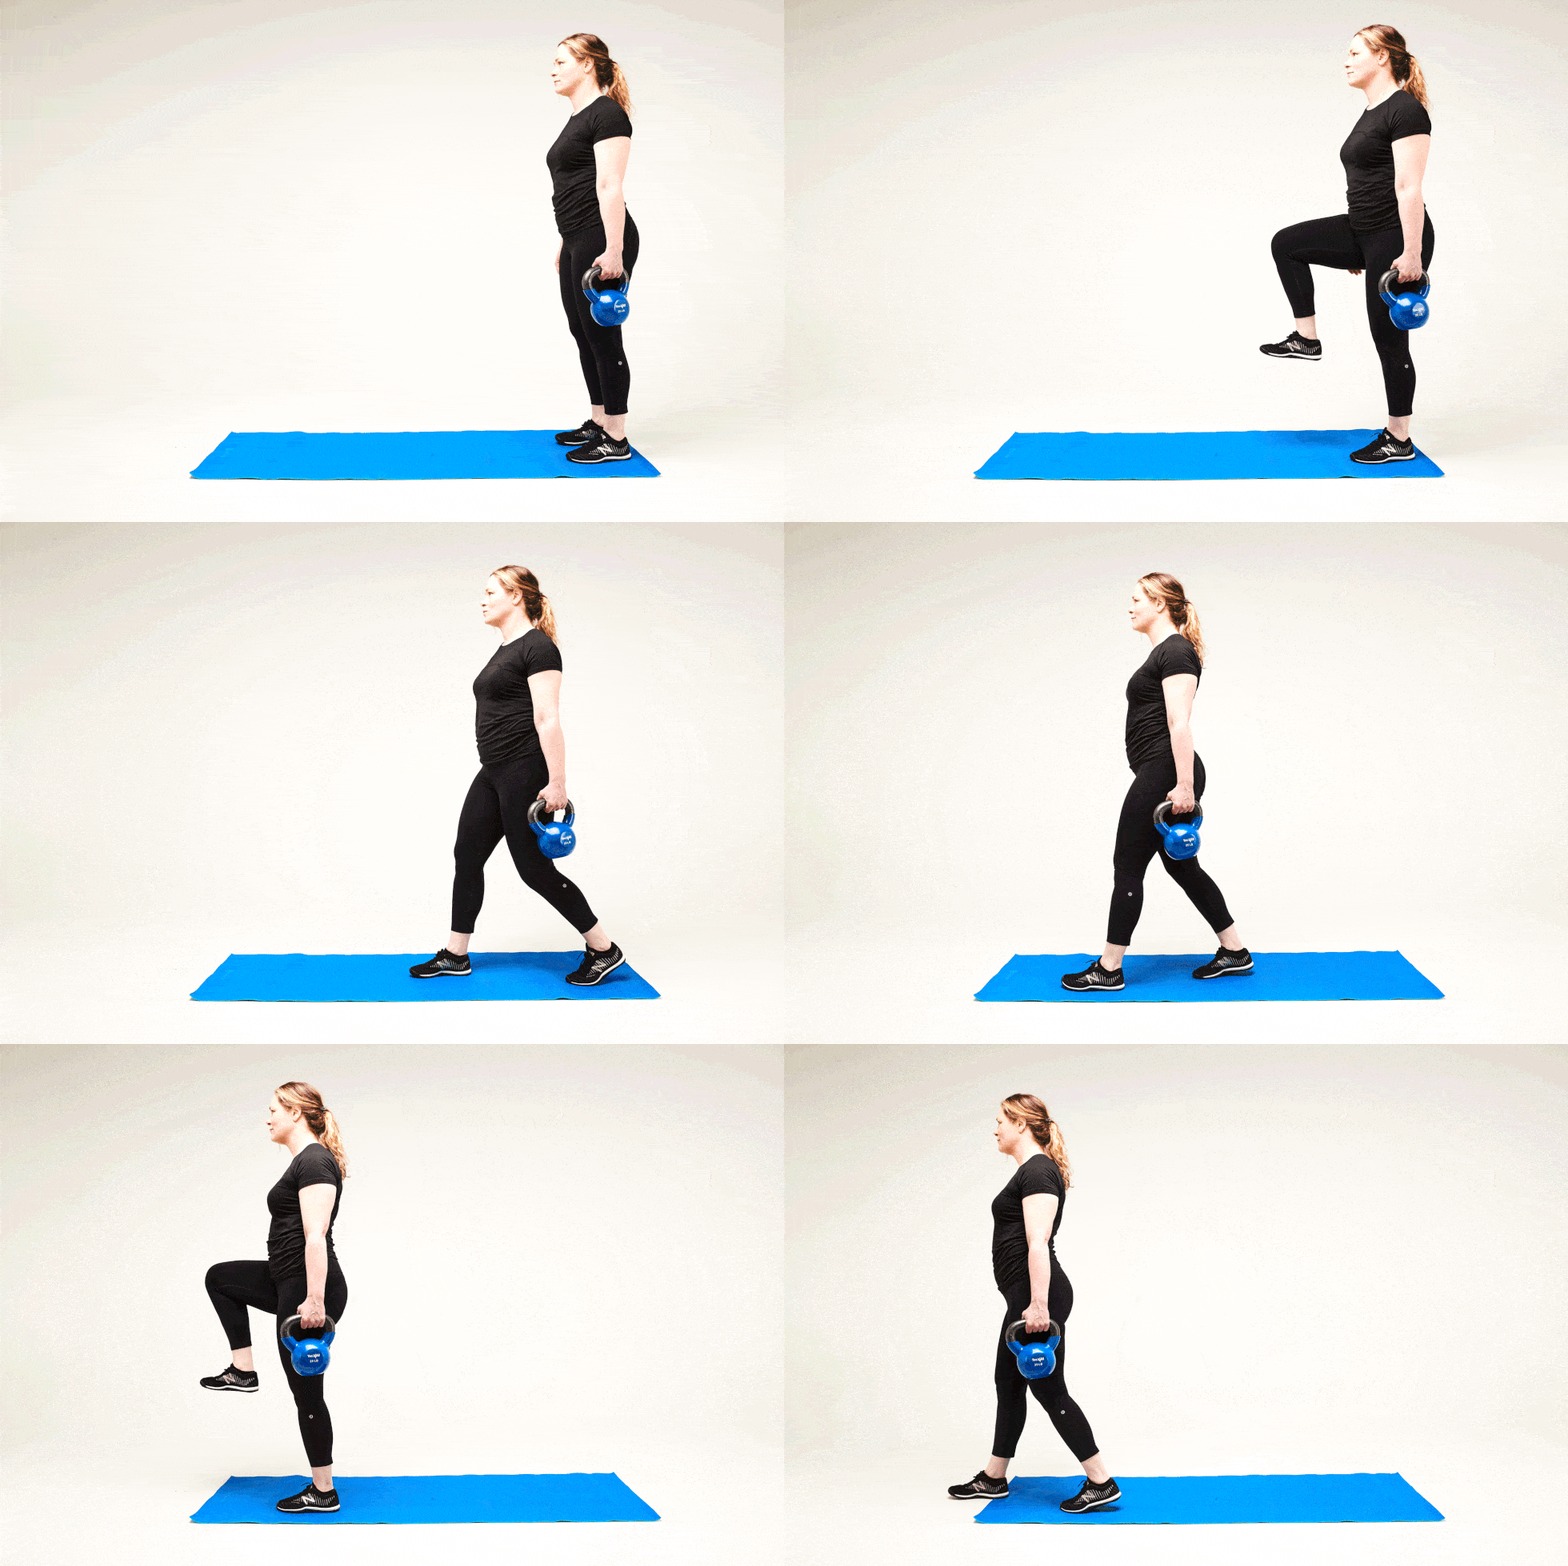
- Stand tall and hold a heavy kettlebell in right hand. (Again, you can use a dumbbell, other free weight, or heavy household object.)
- Slowly march, bringing one leg up so your thigh is parallel to the ground, then place that foot on the ground and repeat on the other side. As you perform the march, try to keep pelvis stable.
- Repeat. Do 12 reps on each side. Do 2 sets total. If you have the space, move forward as you march; otherwise, march in place.
Part 3: Stretch your QL
Lengthen a QL—plus tight hip flexors—with this two-for-one half-kneeling lunge stretch.
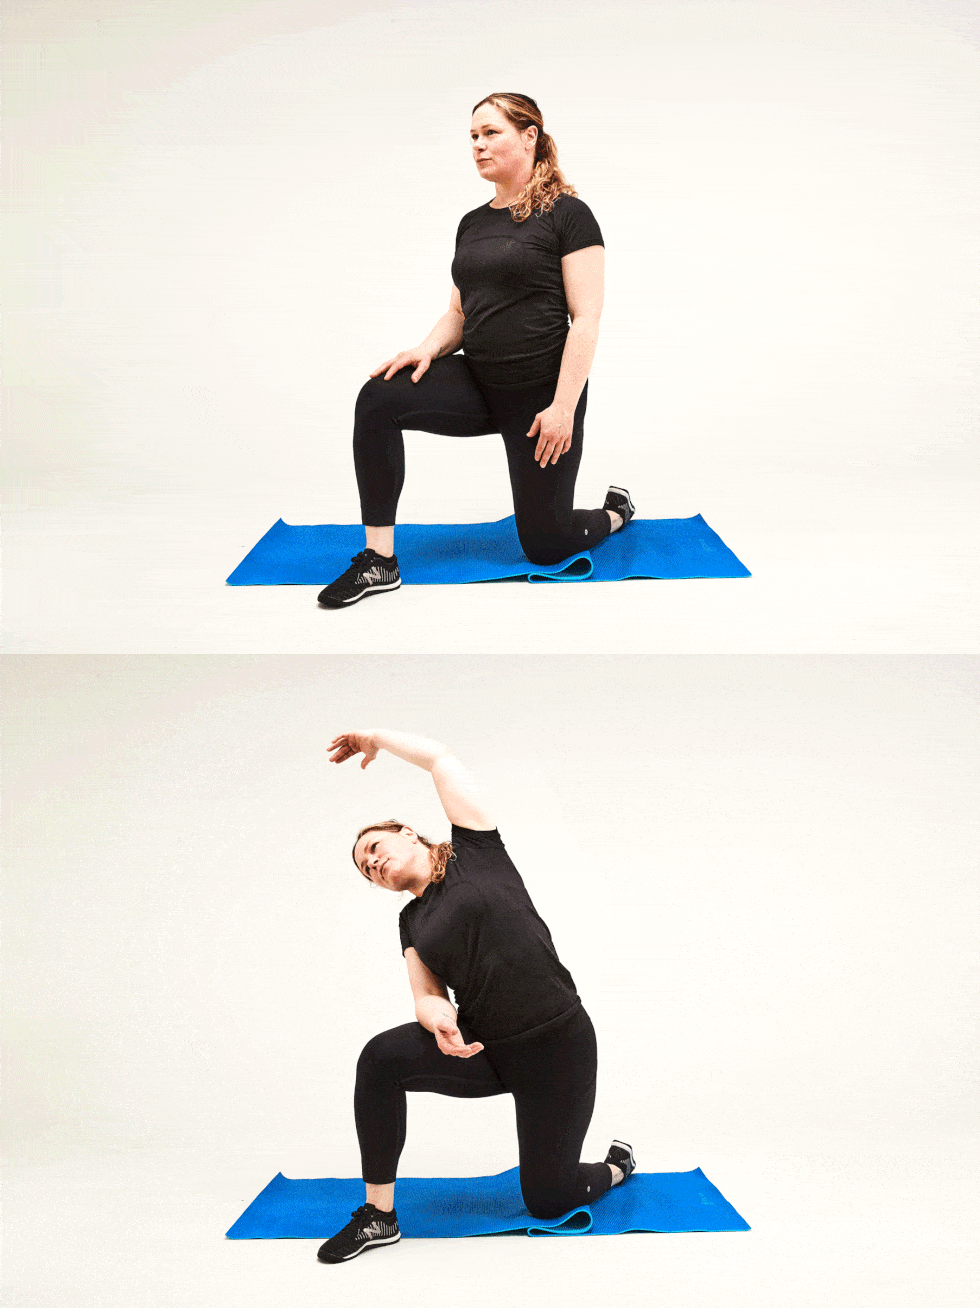
- Get into a half-kneeling lunge position with left foot and right knee planted firmly on the ground, both knees bent 90 degrees. Turn right toes out slightly so that they are outside right hip.
- Raise right arm overhead and side bend toward the left. Maintain a neutral pelvis. You should feel a gentle stretch through the front of right hip and in the side of right trunk.
- Hold for 30-60 seconds.
- Then switch sides and repeat. Do several rounds until you’ve stretched for a total of about 2 minutes per side.
How to Address a Tight QL: Part 2
As an alternative to Agnew’s 3-part series, you can also try the following QL stretches and core-strengthening moves from Haas.
QL Stretches
How to use this list: Do these moves daily, or even several times a day, to bring more mobility to your low back. Perform them before and/or after a run. Important caveat: If your QL hurts more after stretching, or if your QL pain returns soon after stretching, then stretches are likely not the solution and you should stop doing them, Haas explains.
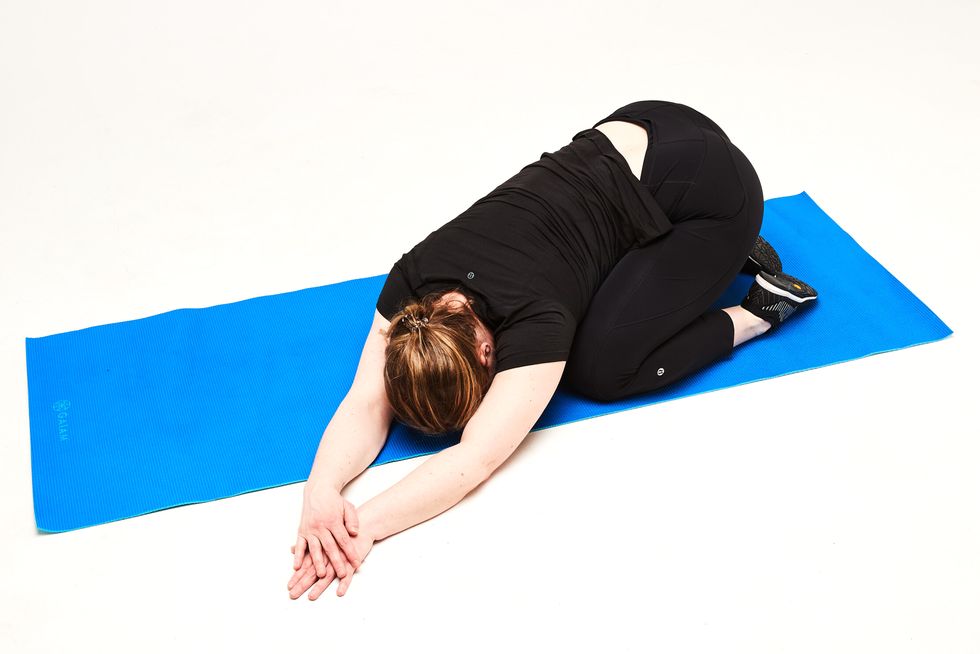
1. Child’s Pose with Side Stretch
 Trevor Raab
- Start on all fours, shoulders over wrists and knees under hips. Bring feet together to touch.
- Keeping back flat, ground down through hands as you reach hips back toward heels. Pause when you feel a stretch in back or hips, or along the side body. This is the starting position.
- Walk hands out in front of you, resting torso on thighs, and head on mat. Hold for a breath.
- Then walk arms to the left side. You should feel a stretch in right lower back. Hold for 10-15 seconds.
- Now walk arms to the right side to stretch left lower back. Hold for 10-15 seconds.
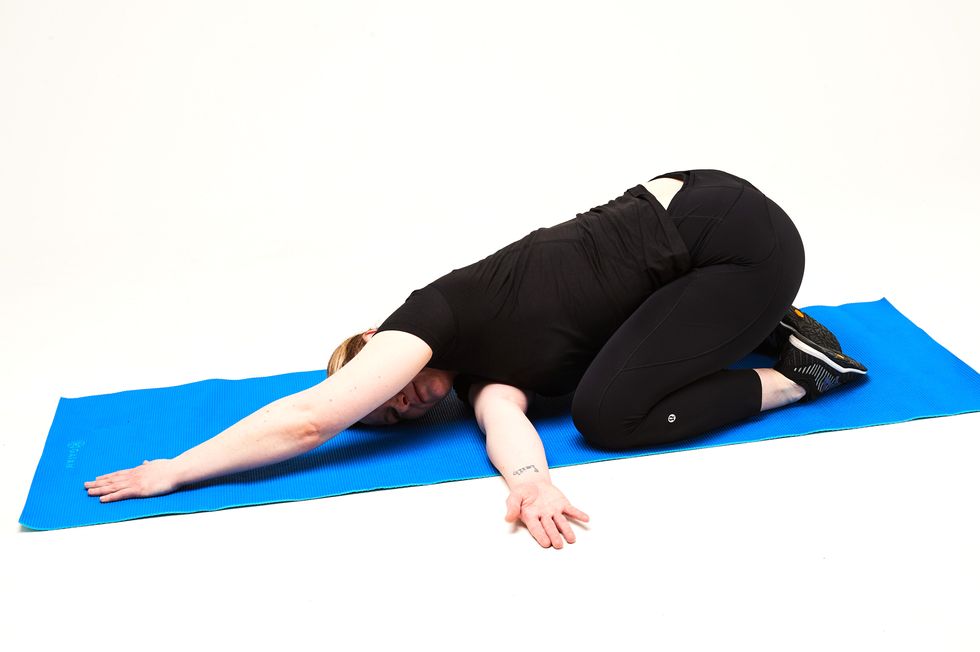
2. Dynamic Child’s Pose
 Trevor Raab
- Start on all fours, shoulders over wrists and knees under hips. Bring feet together to touch.
- Keeping back flat, ground down through hands as you reach hips back toward heels. Pause when you feel a stretch in back or hips, or along the side body. This is the starting position.
- Now actively ground down with left hand as you reach right arm underneath left armpit to “thread the needle.” You should feel a stretch in right lower back.
- Hold for several seconds, then return to starting position.
- Repeat several times until you feel right lower back loosen up.
- Switch sides and repeat to stretch left lower back.
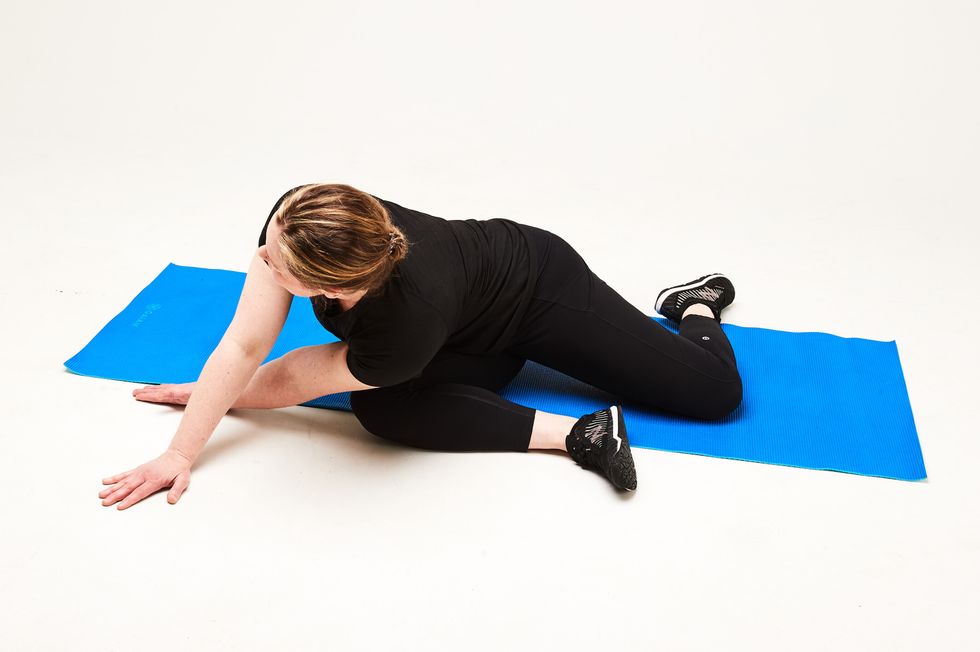
3. Dynamic QL Mobility + Hip 90/90
 Trevor Raab
- Start seated with knees bent 90 degrees and feet planted.
- Place left shin on ground in front of you and right shin on the ground to the side.
- Plant left hand on the ground in front of left knee and place right hand on right hip. This is the starting position.
- Ground through left hand as you reach right arm underneath left armpit to “thread the needle.” You should feel a stretch in right lower back.
- Hold for several seconds, then return to the starting position.
- Repeat several times until you feel right lower back loosen up.
- Switch sides and repeat to stretch left lower back.
Glute and Core Exercises for QL Relief
How to do them: To start, do one set of these moves daily to help your body learn the neuromuscular patterns. (The caveat: If you feel sore, then skip a day.) After about six weeks, do these moves two to three times a week as part of your regular strength-training routine.
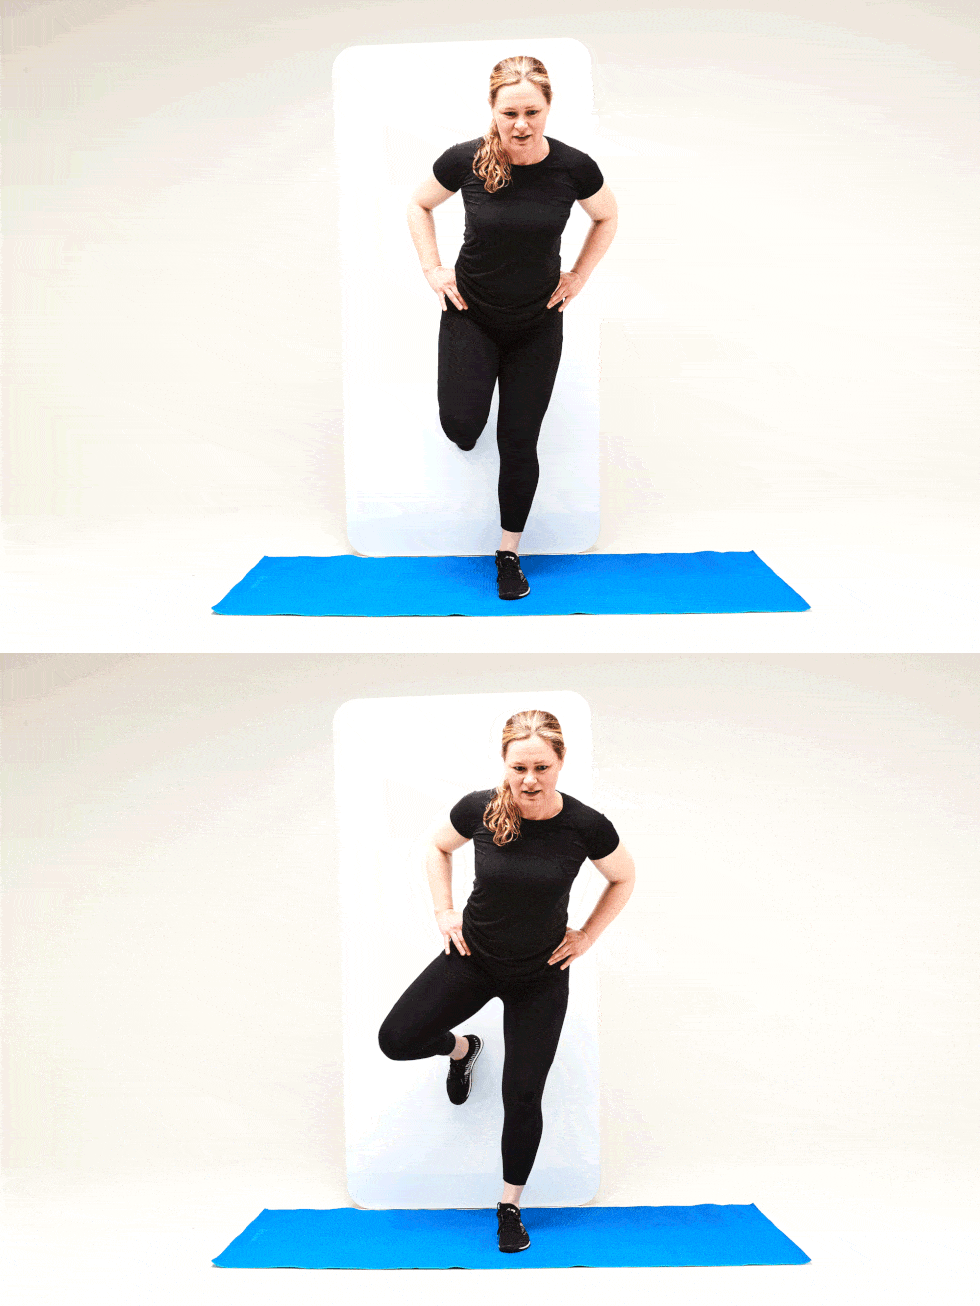
1. Standing Clamshell
 Trevor Raab
This exercise targets the glutes and works on pelvic control in a pattern that’s similar to running. Think of it as an opportunity to train proper glute use in the running pattern, which will help unload strain on your QL caused by weak glutes.
- With back toward a wall, take a few steps forward, and balance on left leg. Lift right foot up (knee bent) to rest foot on wall behind you. Rest right hand on the back of a chair or other sturdy object for balance if needed; don’t lean backward into the wall for support; weight should be on the standing leg. This is the starting position.
- Rotate lifted leg outward to “open” up like a clamshell without letting standing leg collapse inward. Focus on keeping hips level as you move lifted leg.
- Do however many reps you can before losing form, aiming for at least 6 total reps to start.
- Optional: Do another set with varying trunk position/amount of hip hinge (versus standing straight up) to challenge different parts of hip musculature and mimic body positioning while running on hills or flats.
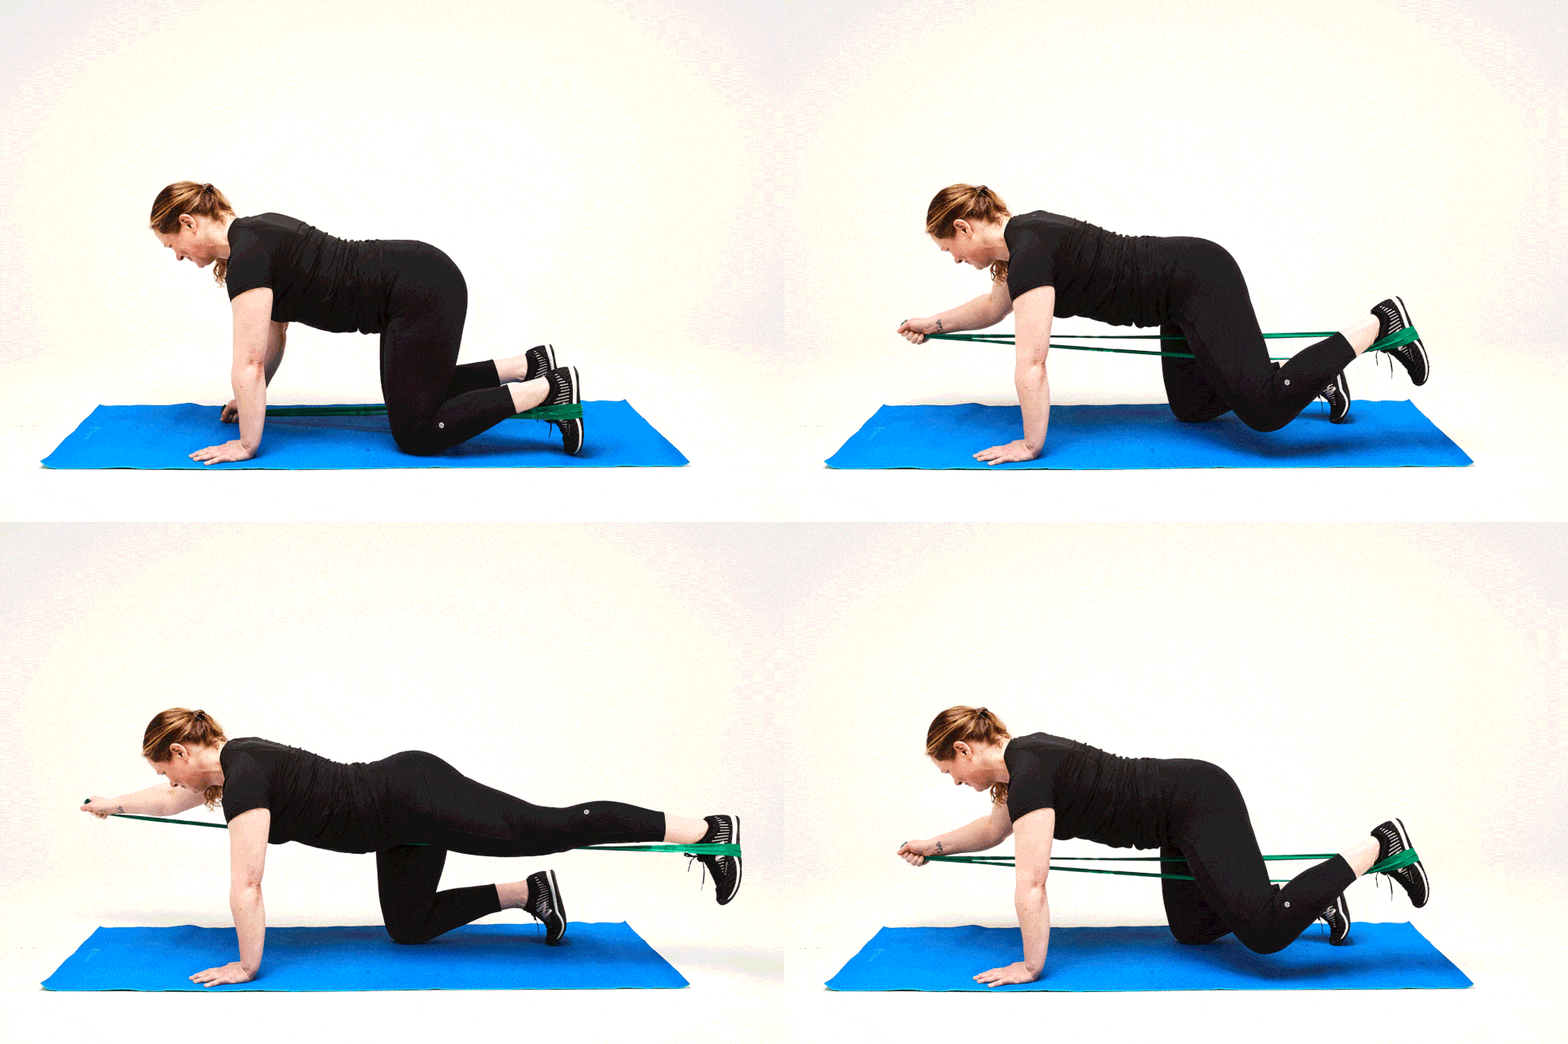
2. Banded Bird Dog
 Trevor Raab
This exercise can improve core stability with the added bonus of strengthening the glutes, resulting in improved running mechanics and reduced excess force to your QL. You’ll need two long, looped resistance bands.
- From an all-fours position, loop one band around right foot and hold it in left hand. The band should cross underneath body diagonally.
- From here, slowly and simultaneously extend right arm and left leg to reach both limbs outward, lengthening spine. Keep shoulders and hips square to ground and core tight with back flat.
- Return to the all-fours position.
- Do however many reps you can before losing form, aiming for at least 6 total reps to start.
When to See a Physical Therapist for Your QL
Sometimes, despite your best at-home efforts to treat an irritated QL, it’s best to get checked out by a physical therapist. Haas recommends booking a PT appointment if you try the above stretches and strength moves and don’t see improvements after about two weeks.
Agnew, for his part, suggests getting evaluated if you’re in so much pain that it’s inhibiting your running. In this instance, generally the earlier you can get seen by a PT, the better, as this helps mitigate pain before it causes other issues, Agnew explains.